
Chapter 15: Document significant findings - what doesn't work in practice
In Chapter 14 we looked at how to use other documents to support risk assessments. In this chapter we’ll focus on examples of how not to document your risk assessment. If you are in a hurry, you can skip this chapter and move to the positive examples in Chapter 16.
I’ve included examples of commonly used risk assessment table formats, with an explanation of why they don’t support an effective risk assessment process.
15.1 Risk before and after
In Chapter 5 we discussed the iterative nature of Steps 2 and 3. It is likely that the layout shown in Figure 15.1 was a well-meant attempt to support some iteration of control and assess.
Figure 15.1: Typical risk assessment template with before and after
| Hazard | People harmed | Existing controls | Existing risk | Additional controls | New risk | Done | ||||
|---|---|---|---|---|---|---|---|---|---|---|
| L | S | R | L | S | R | |||||
| Hazard 1 | ||||||||||
| Hazard 2 | ||||||||||
The table encourages you to follow the five steps in this order:
- Step 1: Identify the hazard and who might be harmed (columns 1 and 2)
- Step 3: Document the existing controls
- Step 2: Assess the existing risk
- Step 3: Think of some additional controls
- Step 2: Assess what the risk would be if you put those in place
- Step 5: Indicate when the additional controls have been implemented.
Since step 4 is documenting the risk assessment, it is implicit in documenting the other steps.
While well-intended, without an infinite number (or at least a very large number) of columns, you can’t capture all the iterations of steps 1 – 2 – 3 in a single table. The finished risk assessment needs to show where the organisation believes the risk to be now. Is it acceptable, or do we have to stop until we can do more?
This also requires numeric judgements of likelihood and severity, multiplied together to estimate a risk value – something argued against in chapter 7b.
15.2 Risk with and without controls
Another variant is for organisations to try and consider the risk with and without controls, as suggested in Figure 15.2.
Figure 15.2: Risk assessment template with uncontrolled and controlled risk
| Hazard | People harmed | Risk with no controls | Controls | Risk with controls | Done | ||||
|---|---|---|---|---|---|---|---|---|---|
| L | S | R | L | S | R | ||||
| Hazard 1 | |||||||||
| Hazard 2 | |||||||||
I can see where this came from. In the previous example, you might have noticed that step 3 (current controls) was documented before step 2. So, in an attempt to follow the steps literally. the matrix in Figure 15.2 attempts an assessment with no controls whatsoever. The best argument I read against this approach was spelled out by Chris Jerman and Duncan Spencer in “Risk-led safety: evidence driven management (1st edition)”:
Exactly what constitutes “no controls”? Let’s take the example of a welder. No controls would be someone who couldn’t weld sitting in the nude with a welder in hand. OK, a daft picture to paint perhaps; so the person has the competency to weld, they have overalls, boots, gloves and a mask, but aren’t they the controls that they’d be supposed to have?
You could argue that even a naked adult with a welder would have some world knowledge about the risk of heat. So what about a child or a baby? It makes no sense to assess such an absurd situation, so in reality people assess with and without the things they see on the day, like PPE.
If you wanted to emphasise the importance of the on-the-job controls to a worker you could re-label as shown in Figure 15.3. I’ll develop this idea (without the numbers) in Chapter 16.
Figure 15.3: Risk assessment template with uncontrolled and controlled risk
| Hazard | People harmed | Risk with no on-the-job controls | Controls | Risk with on-the-job controls | Done | ||||
|---|---|---|---|---|---|---|---|---|---|
| L | S | R | L | S | R | ||||
| Dust from drilling | Worker | 5 | 3 | 15 | PPE – dust mask | 3 | 2 | 6 | |
| Fall from a ladder | Worker | 2 | 4 | 8 | Check ladder | 1 | 4 | 4 | |
However, this assumes the background controls are always in place and effective, which could give the worker a false idea of the risk. They might even use the numbers as a reason not to apply the controls – is going from an 8 to a 4 worth the effort? I’ve never seen a with and without assessment done in a way that would be useful, but please let me know if you have.
As with the recommendations in Chapter 8, you could go further and replace the LSR numbers with a harm statement.
Ask yourself:
How would you complete the empty cells in the risk assessment table in Figure 15.4? Would this work for the type of risk assessments you do?
Figure 15.4: Using harm statements before and after application of controls
| On-the-job control | Harm if you don’t apply on-the-job controls | Effect of applying the on-the-job control |
|---|---|---|
| Check the ground before erecting the ladder, moving tools and other items from the area | If the ground is unstable or uneven your ladder might fall over and you could suffer injury | You reduce the likelihood that the ladder will fall over, and reduce the harm caused by landing on tools or other items |
| Check the ladder once erected to make sure it is correctly set up | If the ladder is not set up correctly, it could collapse and you might suffer injury | You reduce the risk that the ladder will collapse |
| Attach tools to your work belt so you can use both hands while climbing |
This could be rather repetitive in a risk assessment, but could be useful as a training exercise to understand the controls.
15.3 HSE template
I like the fact that the HSE risk assessment template doesn’t ask for a numeric assessment of the risk. However, as I suggested in Chapter 13, I don’t like the way it uses five columns to document controls. To demonstrate the problem, Figure 15.5 shows these five control columns for hazards involving incorrect storage of goods in a warehouse (I haven’t shown the hazard and who is harmed columns).
Figure 15.5: Using five control columns
| What are you already doing to control the risks? | What further action do you need to take to control the risks? | Who needs to carry out the action? | When is the action needed by? | Done |
|---|---|---|---|---|
| Annual refresher training in correct storage procedures | More annual refresher training | Training manager | Annually, for ever | |
| Requiring 6 monthly checks of maximum load capacities | Actually doing 6 monthly checks | Warehouse supervisor | Every 6 months, forever | |
| Daily checks of warehouse racking are done but unrecorded | Daily checks to be recorded by sending a photo to the safety manager each morning | Warehouse supervisor | Daily, forever | |
| Using brackets to hold shelves. | Replace old brackets with new ones | Facilities team | Within 3 months | yes |
| Inspect the new brackets at least once in 3 months. | Facilities team | Quarterly, for lifetime of equipment |
Working through the controls in Figure 15.3:
- Annual refresher training has happened before, but I need to make sure that annual refresher training continues. As long as we do this job, the refresher training will be needed, so I’ll never be able to tick ‘done’.
- 6-monthly checks of maximum load capacities will need to go on for ever
- The risk assessor might have concluded that while daily checks of warehouse racking are probably done, at least most days, it would be practicable to add a further level of control by recording the checks. To minimise the bureaucracy, the team have agreed their preferred way to do this is by sending a photo of the racks to the safety manager each morning. This too will go on forever.
- The risk assessor might have identified concerns that the current brackets, while holding, are not as effective as newer variants. So a “further action” is to replace the old brackets with new ones. At last, an action we can assign to a team with a deadline. At the point we’ve finished the risk assessment, it isn’t done. But let’s assume we’re three months in, and it’s been done. But we need to add a further control, to inspect the new brackets quarterly. Until they are replaced.
Conclusion: most actions will never be signed off.
As stated in 15.1, a finished risk assessment needs to show where the organisation believes the risk is now.
- If the risk is unacceptable without the additional actions, you need to stop doing what you are doing (or delay the activity) until you have something in place which is acceptable. If the activity is business critical, these actions should be in your action tracker with a very high priority.
- If the risk assessment is safe enough without the additional things, but you’d like to get even safer in the long-term, then put them in your action tracker.
Documenting that you plan to put a control in place, and then not doing so, puts you in a worse position than not documenting it at all – see the case against Morrisons supermarket for an example of this.
The danger with creating separate “to do” lists in each risk assessment, is that this is where they stay – inside the risk assessment. If you’re using Excel or Word for your risk assessments, what is the trigger to open the document and check the actions? Perhaps when you come to review the risk assessment in a year or two you’ll notice the outstanding actions. But that could be too late.
If you have some great software-based safety management system which collates all the “to do” actions from each risk assessment into an action tracker, assigns responsibility and chases the individuals assigned to complete their actions, that’s great. But even then, do you need those actions in the working version of the risk assessment that someone will use to support a job?
Mixing up actions that are done once (like buying new equipment) and those that are done regularly (like checking that equipment) makes the risk assessment difficult to use. The documents in Chapter 14 offer cleaner alternatives. By separating the assessment from the action tracker, you preserve clarity and usability. The risk assessment remains focused on what’s been decided, while the tracker handles what needs to happen next.
Ask yourself:
Compare the three bullets in Chapter 13 with the HSE risk assessment template. Then compare with your own risk assessment template. Have you included anything that isn’t needed? Do you think the HSE has included something in their template that isn’t needed?
We return to this question in Chapter 16.
15.4 COVID risk assessments
As discussed in Chapter 3, the 2020 to 2023 COVID-19 pandemic resulted in a massive increase in the number of risk assessments produced. One positive aspect was that senior leaders suddenly took an interest in risk assessment, providing resource and oversight to get the risk assessments done.
As explained in Chapter 11 the HSE example COVID risk assessment fell into the same pitfalls outlined in their own excellent research RR151: Good practice and pitfalls in risk assessment (2003). In particular, “Carrying out a risk assessment to attempt to justify a decision that has already been made.”
For the virus itself, there was only one hazard. I saw other risk assessments where the first two columns were completed on the first page, and then left empty on multiple pages afterwards. The description of the controls is then forced into narrow columns, making it difficult to follow.
A more efficient option to documenting the risk assessment would be to describe the hazard and the default controls in the scope, and structure the assessment by location or the steps of a task analysis as described in Chapter 2.
This would have encouraged a better consideration of whether the controls themselves resulted in further risk – for example:
- Social distancing increasing lone working.
- Infection barriers creating more obstacles for evacuation.
- One-way systems affecting fire escape routes.
- Inventories of alcohol-based sanitisers increasing the risk of a fire.
- Leaking wall-mounted sanitiser gels creating slip hazards.
Some COVID-19 risk assessments asked assessors to score the risk of COVID-19. The worst thing that could happen at the time was multiple deaths, which is likely to be your highest category of severity, and will be the same on every row of your COVID-19 risk assessment if the hazard is always COVID. We knew too little about COVID to estimate likelihood. If no one in the location had COVID-19, the probability of transmission was zero. The proportion of people in the population with COVID-19 varied during the pandemic, so you would have to keep changing the likelihood, week-by-week.
The takeaway from this in relation to recording significant findings is that you don’t have to stick with the labels in the default risk assessments if it results in repetition, omissions or confusion.
15.5 Formatting
By comparison, this is a minor issue, but take a look at the example in Figure 15.6, based on real risk assessments I’ve seen, and see if you can derive some rules about formatting.
Figure 15.6: Poor formatting of risk assessments
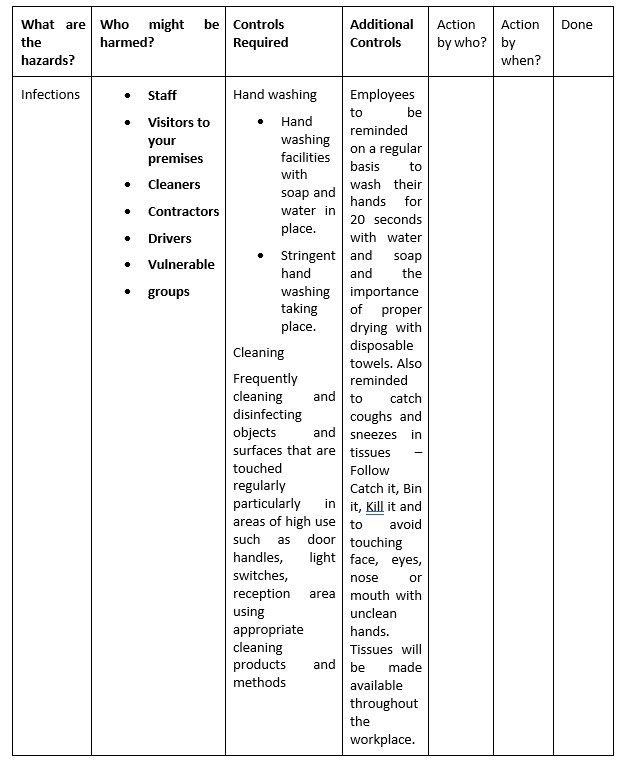
Apologies that this is not screen readable, as I needed to use an image to control the formatting.
Box 15.1: Formatting rules for risk assessments
- Use left justified (right ragged) text. In columns fully justified text is difficult to read and results in very uneven gaps.
- Don’t use bullet points unless it really does add to the clarity. If you use bullet points, align the bullet with the left-hand margin, not indented.
- Use bold text consistently, eg for column headings only
- Keep text together in paragraphs, so that a description is kept on the same page.
- When using Word or Excel (or similar) make sure the headings are repeated on each page.
- Use sentence case – “Controls required”, and “Additional controls”. This makes it easier to read across the headings, especially when they are line wrapped as in our example.
- Don’t bundle multiple controls into a single paragraph. Ideally, one control per row in Excel, or per cell in Word. If choosing an online risk assessment tool, check that it allows multiple controls for multiple hazards.
Appendix 2 provides a re-formatted version of this risk assessment sample, following these rules.
Read Chapter 16 for ideas on how to document your risk assessments better.
You can use the Contact form to send me feedback. If you’d like to receive an email when I add or update a chapter, please subscribe to my ‘book club’
Alternatively, go back to the book contents page
Appendix 1: Case studies by year
Appendix 2: Answers to questons posed in each chapter
Appendix 3: Lost HSE references