Chapter 3: Identify the hazards - doing it differently
3.1 Learning from fire risk assessments
A former head of health and safety for the London Fire Brigade, John Norton-Doyle, explained to me some years ago that fire risk assessments are really two risk assessments. He said:
“In the first, fire is a consequence of ignition, fuel and oxygen hazards. In the second, the fire is the hazard, and the consequences are harm to life if fire detection and suppression, and evacuation, escape and rescue are inadequate.”
The first FRA is a reasonably straightforward exercise, which in a low-risk environment can be carried out by someone with a reasonable grasp of risk assessment and ability to recognise things that might burn, things that might start a fire, doors and windows, and things marked with an oxidiser symbol.
The second FRA often needs more expertise. How do detection and alarm systems work? How often should you check that alarms and emergency lighting are working? How much emergency lighting, and how many signs do you need? There are British, European and ISO standards covering many technical aspects. Understanding which standards you need requires experience and a higher competence level, and purchasing the relevant ones a sizeable budget.

With the first risk assessment we can fill up the first column in our risk assessment with all the things that can burn (oil, paper, plastic), all the things that could ignite (electrical appliances, cigarettes, hot surfaces) and where relevant, anything that will increase the oxygen content (solvents containing oxidising chemicals, open windows and doors). In the second FRA, a first column marked “hazard” could technically contain only the word “Fire”. Since that doesn’t help to structure the rest of the risk assessment, the first column is often relabelled as “issues” or “fire protection measures.” The lack of a smoke detector is not a hazard, but a fire protection measure that needs to be assessed.
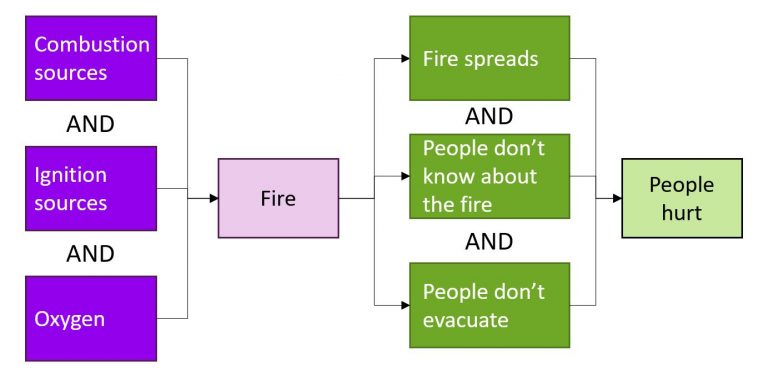
Figure 3.1 illustrates one way to look at this. The purple boxes indicate the categories of hazard that have to occur together in order for a fire to start. Once a fire has started, the green boxes indicate some of the risk factors that individually or in combination could increase the chance that people will be harmed by the fire. Extra green boxes could be added and put in a more detailed flow to show the difference between people not evacuating because they don’t know about the fire, because they do know but choose not to evacuate, and they know but can’t evacuate. In the diagrams that follow I’ve indicated where all factors in the relationship have to be present with AND, and where any one factor will lead to the next stage with OR. But as a tool for thinking through what can happen you can keep it simple. We’ll return to how flow diagrams can be used in a later chapter.
3.2 Application to other hazard types: slips and trips
If this idea of two risk assessments helps us to understand fire better, how could it also help us with other common hazard groups, such as those summarised as “slips and trips” in a risk assessment?

Rather than the lazy approach of sticking “slips and trips” in the hazard column, and treating the twin imposters just the same, the flowchart in Figure 3.2 takes a similar approach to the FRA in Figure 3.1 – what could cause the slip or the trip, and what happens once some starts to slip or trip?
In the first part of the FRA (Figure 3.1) we were looking for three types of fire hazard, and all three are needed to start a fire. Figure 3.2 reminds us to look for two types of “slip and trip” hazard – stuff that could leak or spill onto the floor, causing a slip, and obstacles on the floor that could result in a trip. In this case, we need only one hazard to cause an accident (hence the “OR”). There are other things that could result in slips and trips, but for the sake of this hazard identification exercise, assume these are the only significant categories.
Looking at Figure 3.2, in the first slip and trip risk assessment I am prompted to list all the things that might leak or spill (drinks, oil from machinery, water from a sink) and all the things that might be obstacles (tool boxes, personal belongings, deliveries) in the first column. Now I have a realistic set of hazards I can plan to manage, rather than the vague “slips and trips.”
For the second risk slip and trip assessment consider all the things that would make someone more likely to lose their balance once their foot slips or trips, and to hurt themselves if they fall. Poor lighting or carrying a bulky load might make someone less stable. Individual factors like balance and infirmity, and environmental factors like the presence of a handrail or grab rail, will impact whether or not they fall. These are sometimes referred to as risk factors, as they impact the likelihood or the severity of the outcome, but are not themselves hazards.
3.3 Application to health, welfare and wellbeing
As we identified earlier in this chapter, hazard identification tends to focus on physical objects that can cause accidents. Putting “health, welfare and wellbeing” into the hazard column will not overcome this. However, you should be using these words as part of the hazard identification process. We can put “poor health” or “wellbeing suffers” at the end of a flow, and work backwards to identify the factors that protect against negative outcomes, and the hazards that kick the process off. Figure 3.3 provides an example for one aspect of wellbeing, reminding us that identifying the causes of stress is more useful than offering counselling and free fruit (more on this in Chapters 11 and 12).
The three psychosocial hazards shown as leading to stress in Figure 3.3 are from the longer list of factors suggested by the HSE (see Box: HSE management strandards). You might need to consider all of them, or find that different ones are more relevant in your organisation. The key point is that having some structure will help you to identify hazards you can manage – putting “stress” into the hazard column will not.

Box: HSE management standards
The HSE management standards provide a good checklist for identifying hazards that can lead to stress-related conditions. These are listed here, but I encourage you to look at the detail on the HSE website:
Demands: look for excessive or insufficient workload (being bored can be stressful too), work patterns and the work environment
Control: people are better at coping with demands they have some control over, than demands placed on them by others.
Support: knowing that our boss and our colleagues are on our side makes it easier to cope. What factors in your organisation prevent people from supporting each other? For example, competitive targets, or lone-working. Has this become more of a problem with a pandemic-led increase in homeworking?
Relationships: this overlaps with support, but includes how organisations deal with unacceptable behaviour such as harassment and bullying.
Role: asking someone to do a job quickly “but do it safely” sets up a conflict in their role. Not being told what you need to do is equally stressful.
Change: I’ve seen so many organisations get this wrong, from large corporates, through government departments, to small owner-manager businesses. Senior management seem to think no one will notice that change is being discussed, so they chose not to communicate with workers. People would rather know which jobs are at risk, even if it’s their job, than be left in the dark.
For other health hazards it is useful to construct your own checklist of what might be relevant in your organisation. For every task or location you could remind your self to look for hazards in those categories. As a starting point, consider exposure to vibration and noise and look for hazards that can lead to respiratory, skin or musculoskeletal disorders.
3.4 Application to complex problems
While stress, noise, vibration and some other health issues involve hazards that are not easily seen with the I-spy approach, the topics are well-documented, and there is plenty of guidance available to help you structure your hazard identification. Some abstract hazards are less well documented and will be very dependent on your circumstances. In our structured “what if” example for making tea we could have considered the impact of emotions. What if someone was too angry, too tired, too lazy or even too curious? Anger and fatigue can lead to errors and carelessness; being lazy might result in missed steps. Being too curious might lead a worker to experiment with a process. That might be alright when making tea, but what would the impact be on a safety-critical process? Check Uddin v Associated Portland Cement Ltd (1965) for where curiosity led to disaster.

Figure 3.4 considers anger within the hazard identification stage. People who need to make a claim for benefits sometimes become aggressive towards the claim handling staff. If you identify the claimants as the hazard, an engineering solution is to put physical barriers between the claimants and the staff. In practice, this tends to make relationships worse. If you identify “anger” as the risk factor, you can ask what hazards might create the anger, and deal with those at source. As Figure 3.4 shows, being kept waiting without any information, when you are already worried about how you are going to pay the heating bill this month, is a key source of frustration. Identifying these problems as a hazard is a more useful outcome of the risk assessment that lazily writing “claimants” or “violence towards staff” in the hazard column.
3.5 Application to COVID-19 (other pandemics are available)
There was a virtual avalanche of new risk assessments in 2020. Impressively, rather than the annual token review, these were updated regularly – one colleague proudly explained they were on version 23, within a year of the first risk assessment. These were the risk assessments that helped us to get back to work, back to school, back to church and back to living life in the new normal of the COVID-19 pandemic.
We knew what the hazard was: it was COVID-19. We knew that it could kill, but we didn’t know for any cohort of people how likely it was that anyone in that cohort had it already and could transmit it, nor did we know how resilient any of those people would be to the virus if they did catch it. We had to assume that it was possible, and that although many of the measures needed under normal circumstances would not have been “reasonably practicable” (see Chapter 11) they had to be done anyway. So restaurants had to open with fewer customers than was economically viable, public transport had to run with fewer travellers, and workplaces had to operate with fewer staff in the workplace.
The UK HSE rather hurridly produced a risk assessment example for organisations to use as a model. Given the only hazard you needed to assess for the “COVID Secure” status was the virus itself, what could they put in the hazard column? Disappointly, the HSE defined the hazards as the lack of the controls that had already been determined were needed. For organisations following this template, the conclusion of their risk assessment was pre-determined – they needed to apply social distancing, physical separation, hand washing and workplace cleaning regimes, without regard to practicability.
As many people found, putting “COVID-19” in the hazard column was not a useful way of working out where to put hand sanitisers, how many people could be present, and what one-way systems were needed in the building. More experienced risk assessors looked instead at other ways to structure their risk assessments. So the first column might be locations around a building where people could come into contact with each other. Or it could be steps in a process, not dissimilar to what has already been suggested for task analysis. Other countries simply told employers what controls were needed, and told them to risk assess the impacts of those changes using existing risk assessments.
A flowchart model might have provided the structure needed – see Figure 3.5 for one last example.

In Figure 3.5 the main hazard (the equivalent to fire in our FRA example) is not COVID itself, but the presence of an infected worker in the workplace. This prompts us to consider what might cause someone to come into work with the infection. Before testing was available, these purple blocks would have been different, focussing on awareness of symptoms, and knowledge of being in contact with someone else infected. This should help you to consider the support you provide to workers to test, and to stay away from work when infected. Once an infected worker is in the workplace, most sources suggest there are three routes for infection – via contact surfaces, via the air (where the virus is assumed to remain in the air for a period) and directly, for example when someone infected coughs particles onto another person. Now you have a structure to identify specific workplace hazards. You could identify:
- surfaces which are likely to be touched by two people in succession (such as door handles and light switches)
- locations where people are breathing in the same air (particularly smaller, less well-ventilated rooms)
- situations where people are in close proximity (for example, a manual handling task where people have to work together, or corridors at busy times of day)
3.6 Conclusion
In Hazop and Hazan Trevor Kletz defines a hazard as “a substance, object or situation that can give rise to injury or damage.” Immediately, there is a clearer emphasis on substances, which often result in health hazards, over objects that more often relate to safety hazards. The inclusion of the word “situation” also prompts the identifier of hazards to look beyond what they can currently see. Where a hazard could be an object or a situation, which you put in the risk assessment depends on the context. For a risk assessment of a location, the hazard might be an object such as a ladder or a roof. For a risk assessment of a job of work, the hazard might be a situation, such as working from a ladder or climbing onto a roof.
The key message here is to recognise that hazard identification is not a single step, but an iterative process of working through task steps, “what if” thinking, evaluating the severity and likelihood, and coming back to the question of whether there is a hazard to control. And it involves considering the people who could be harmed, something we look at in more detail in Chapter 4.
You can use the Contact form to send me feedback. If you’d like to receive an email when I add or update a chapter, please subscribe to my ‘book club’
Alternatively, you can go back to the book contents page.